 INTEROPen
1. Overview
A common task for developers is to investigate how to create a API FHIR server with some basic FHIR Patient search with data that can be searched to demonstrate meaningful results. This demonstrates the use of several open source tools for the main elements:
- API FHIR servers
- Object Relational Mapping tools
- Data loading tools
The challenges faced in this approach about creating and subsequently maintaining the data mapping between the FHIR server and the database tables. A common design pattern to build a connected FHIR server is shown by the Care Connect Reference Implementation, CCRI. The CCRI showed a FHIR Server implementation on top of an existing database structure. Thus showing the three elements described above i.e. a Care Connect FHIR Server on top of a SQL database using a HAPI RESTful Server with data loading. If you want to build your own then see more by clicking here.
Another approach is to use the FHIR profile structure to store the information directly as documents. This approach can quickly show the main elements of a FHIR server without the complexity of creating, mapping or maintaining a database structure. Using a document data store like MongoDB.
This guide is a detailed breakdown of how to install and connect a FHIR server with a document store. By simplyifying the connection of the server to a backend and increasing how quickly a developer can get a meaningful server up and demonstrating the power of FHIR. This guide shows the core key features of the CCRI i.e. how to build a FHIR Server providing a FHIR Patient API but with a MongoDB backend database. the main parts to getting a demonstrable FHIR server are:
- Install the pre-requisites
- Store a patient
- Retrieve a patient
- Search a patient
2. Pre-requisites
There are three elements to creating your own server are:
- FHIR Server
- Data store
- Tools to support development
- Fast starter module
Then connect the Pre-requisites together.
2.1. FHIR server
To create a local FHIR Server, there are several open source or evaluation FHIR Servers options:
2.2. Data
To return meaningful information from a FHIR server requires a data store of some variety and a way to populate or return the information stored. In this guide we will demonstrate the use of Mongo as a document data store
- Mongo - accept the default installation (port 27017 with no security).
- If you have docker installed you can alternatively use the Mongo image from docker instead.
- Optional: In addition you may wish to install Mongo Compass to explore the data.
This will allow a fast way to populate, store and retrieve data from a FHIR servers via POST completed FHIR resources and is the simplest method for HAPI and Vonk to load data see inforation from a FHIR server.
To see combined information with more meanignful test data and please see the live Care Connect Reference Implementation (CCRI). This used ETL: Extract Transform Load and test data linked, however, is a more complicated starting point to explore FHIR. The live Care Connect Reference Implementation (CCRI) does not support POST operations, however, for local installs POST FHIR Resources could be created and used. The CCRI’s connected database structure is similar to a PAS/EPR SQL database and as such ETL tools such as Microsoft SQL Server Integration Service (SSIS) can be used to import the data.
2.3. Tools
Access the following free software will help your development:
- Postman - allows us to add a FHIR Patient to the server and perform a queries without a front end or going into the command line
- IDE, for Java examples include:
- IntelliJ Community (The screen shots below use IntelliJ)
- Eclipse
2.4. Fast starter module
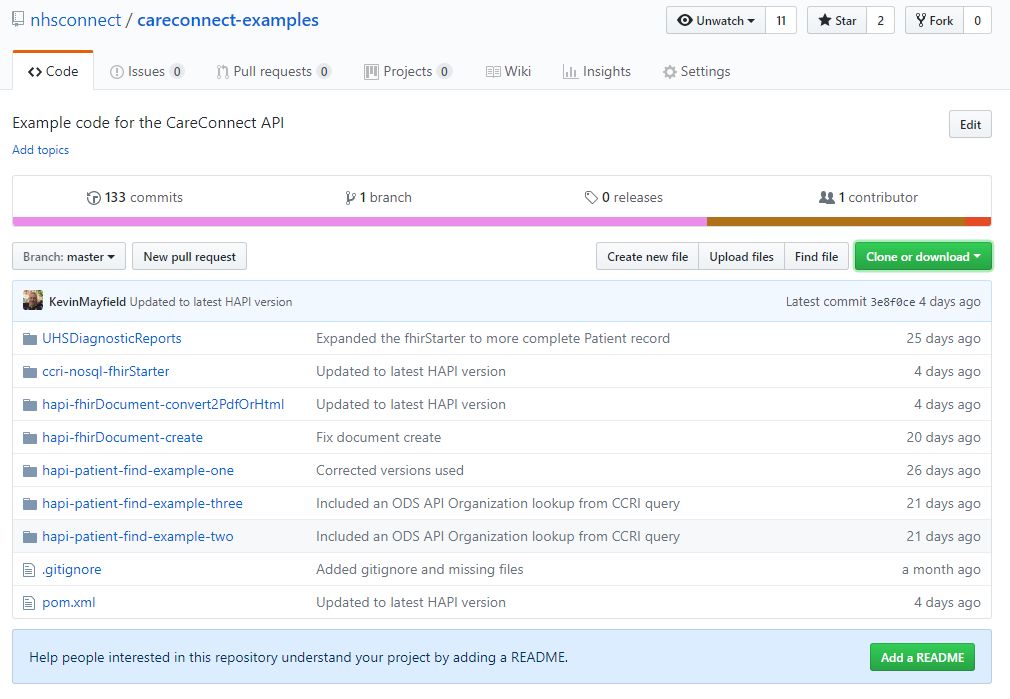
In your browser navigate to the Care Connect Examples project, which contains the FHIRStarter module and then Clone or download the project.
Within your IDE (IntelliJ or Eclipse) import the project.
- On IntelliJ (windows) select File->New->Project from existing sources.
- On Eclipse see import project
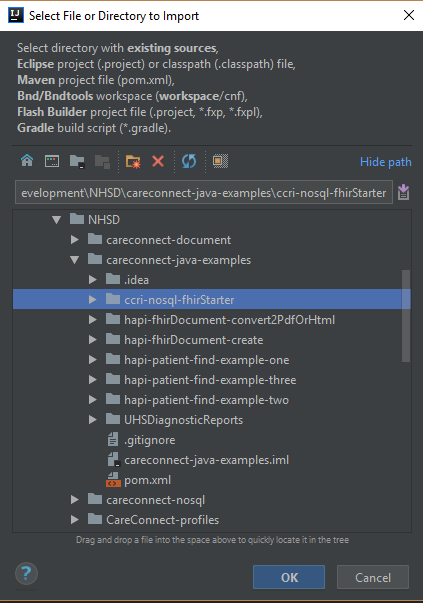
The screenshot above shows how to import the FHIRStarter module, however, you can choose to import the whole project. Please then ensure to import the module as a Maven project and then accept the defaults in the remaining screens (unless you have a prefered setup approach of course).
On IntelliJ select spring-boot:run from the Maven Projects menu.
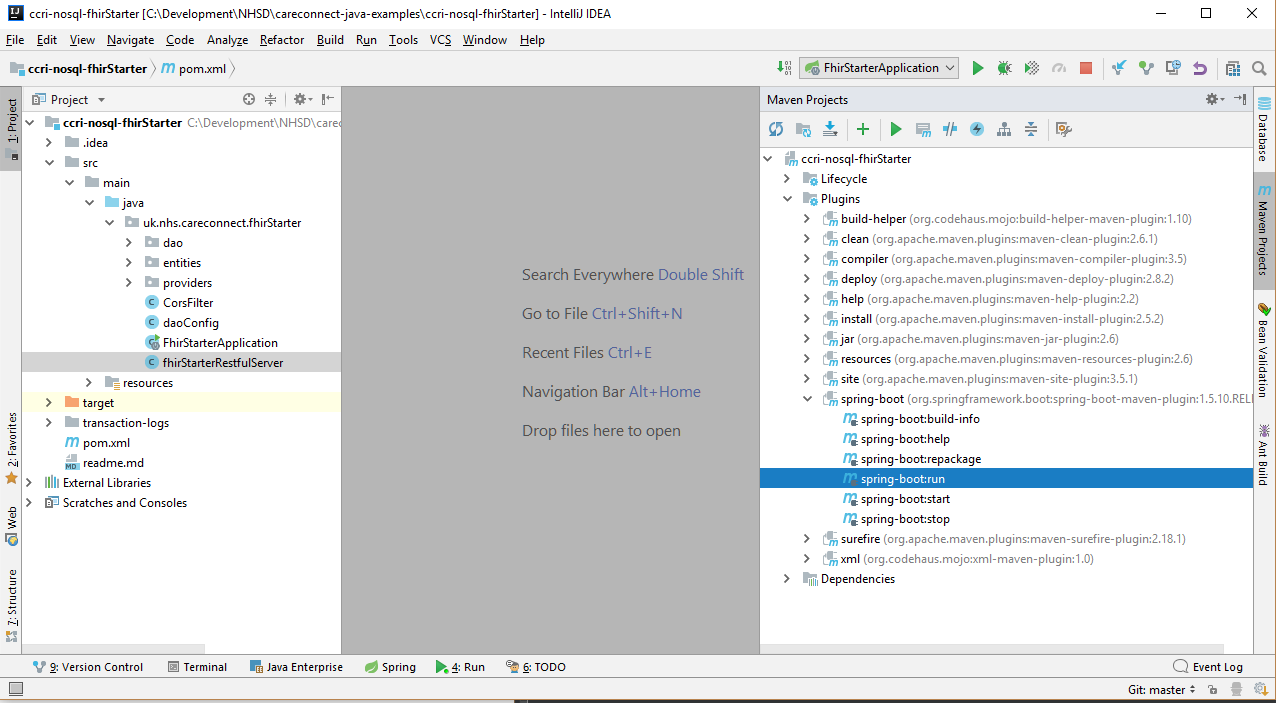
On Eclipse in the Project Explorer, right click the project name -> select “Run As” -> “Maven Build…”
In the goals, enter spring-boot:run then click Run button.
3. Store Patient
If you followed the pre-requisites and whether you have chosen IntelliJ or Eclipse, you should have a basic FHIR server. To test and confirm, start POSTMan and enter this URL
You should see a FHIR ConformanceStatement returned from the server.
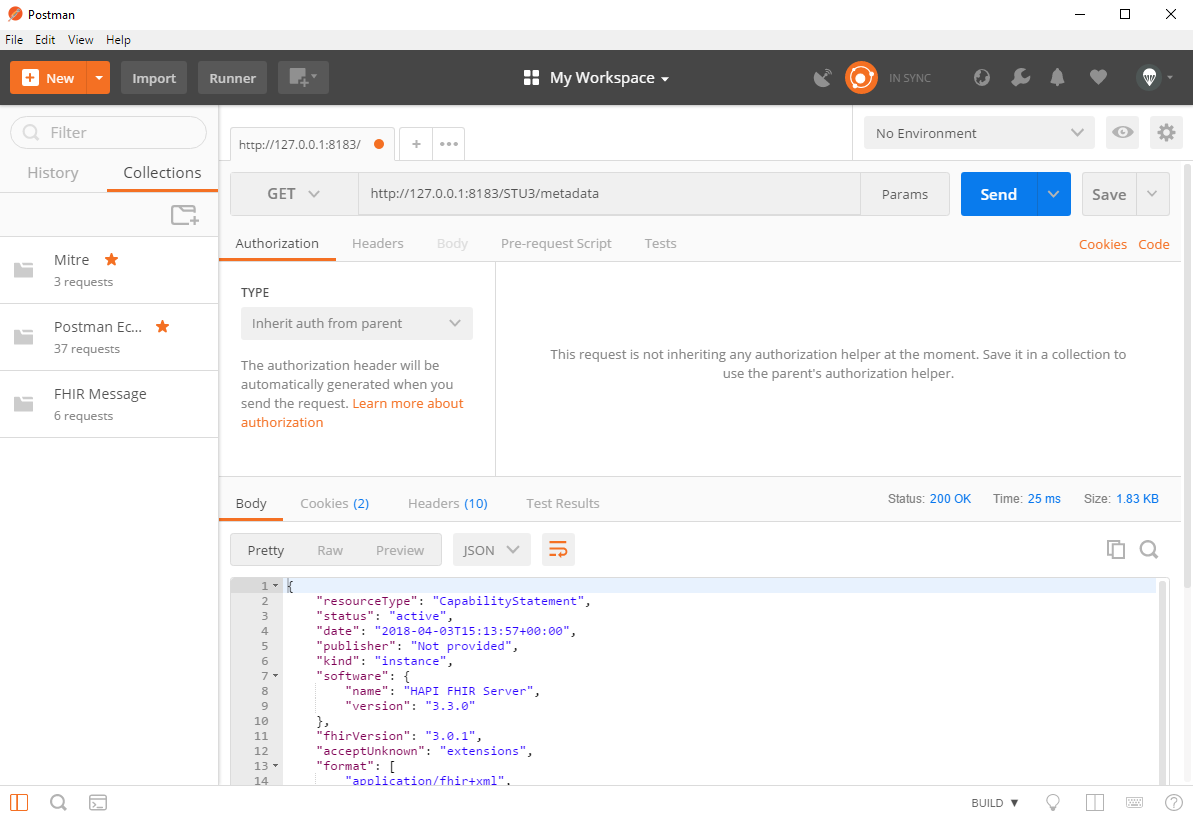
The ConformanceStatement shows the server supports FHIR Patient and the Create operation.
      <resource>
           <type value="Patient"></type>
           <profile>
               <reference value="http://hl7.org/fhir/Profile/Patient"></reference>
           </profile>
           <interaction>
               <code value="read"></code>
           </interaction>
       </resource>
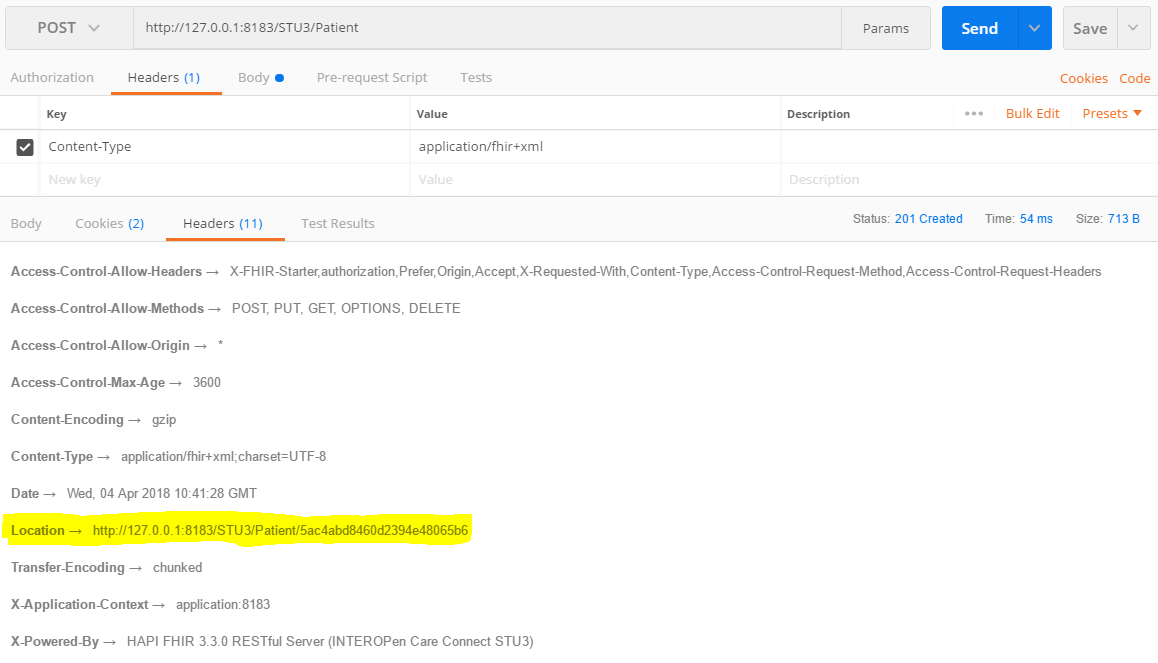
Now add a Patient to our server. In POSTMAN the
- url is
http://127.0.0.1:8183/STU3/Patient, - the action is
POST, - under Headers add a
Content-Typekey with a value ofapplication/fhir+xmlor ‘application/fhir+json’ (if your example is in JSON format set)
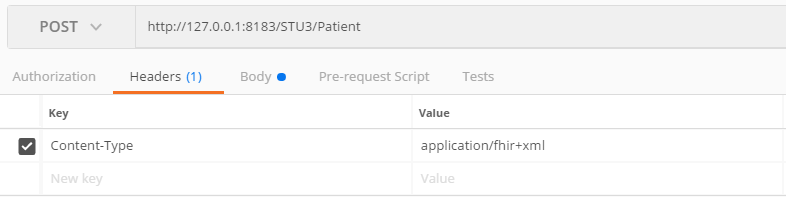
Then copy a FHIR Patient into the Body section.
- This example uses Patient/1 from the CCRI server in the image below
- Then click
Send
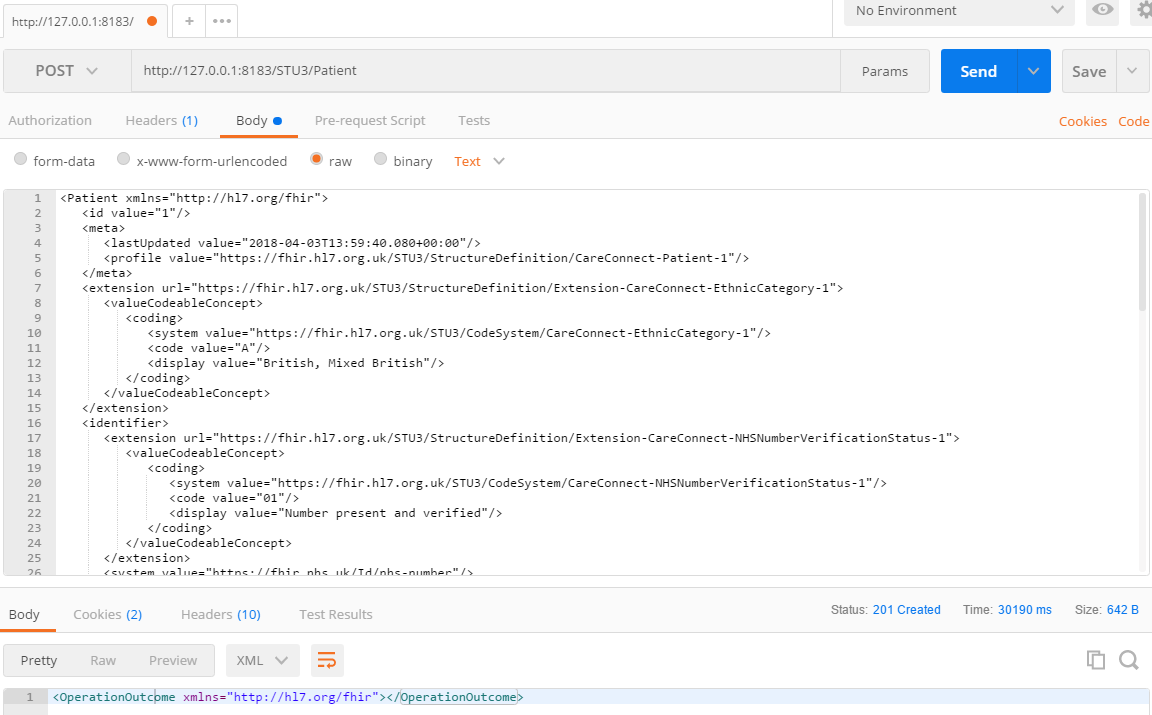
The response Status should be 201 Created which indicates the Patient has been added to the server.
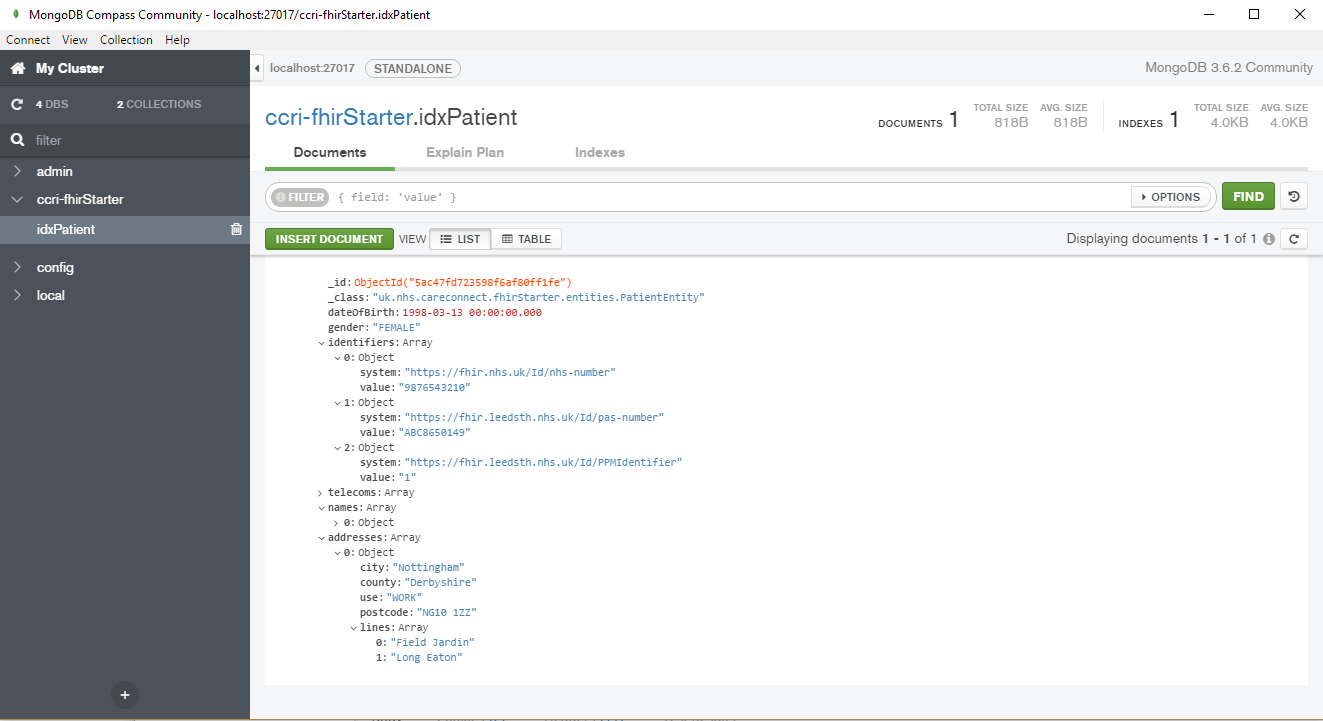
If you installed MongoDB Compass you will be able to view the Patient that was just added. The patient document is very similar to the FHIR Patient we posted into the database. It’s not the same for two reasons, firstly MongoDB uses BSON although this is very similar to JSON it has a few differences. Secondly we’ve not just converted the XML/JSON FHIR Patient to BSON, we have used Spring Data JPA Entities which allow us to simplify the search operations that are add later in this guide.
4. Retrieve Patient
To simplify this guide the description of the FHIR Server components used in the CCRI and this guide are described in the diagram below:
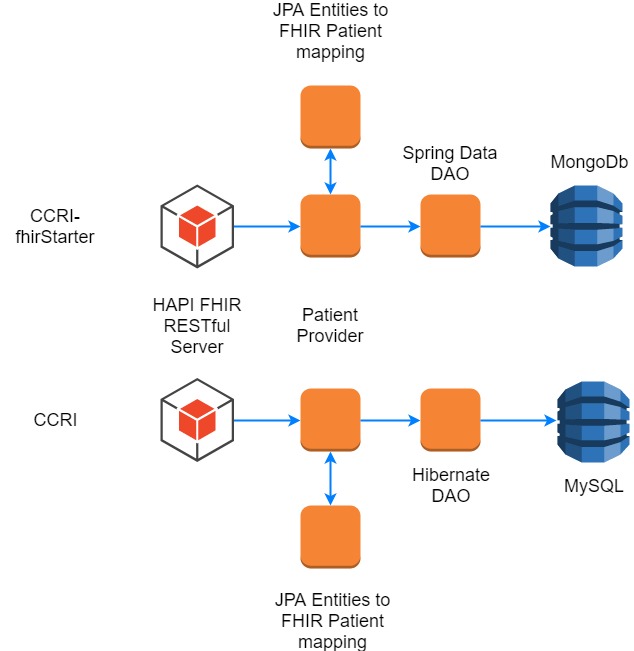
The diagram shows a similar resource storage process and that both projects are composed in a similar architecture. However, the diagram shows the CCRI and this example project are using different database technologies, MongoDb a NoSQL database rather than a MySQL a SQL database and also different object mapping technologies: Spring Data MongDb instead of Hibernate ORM.
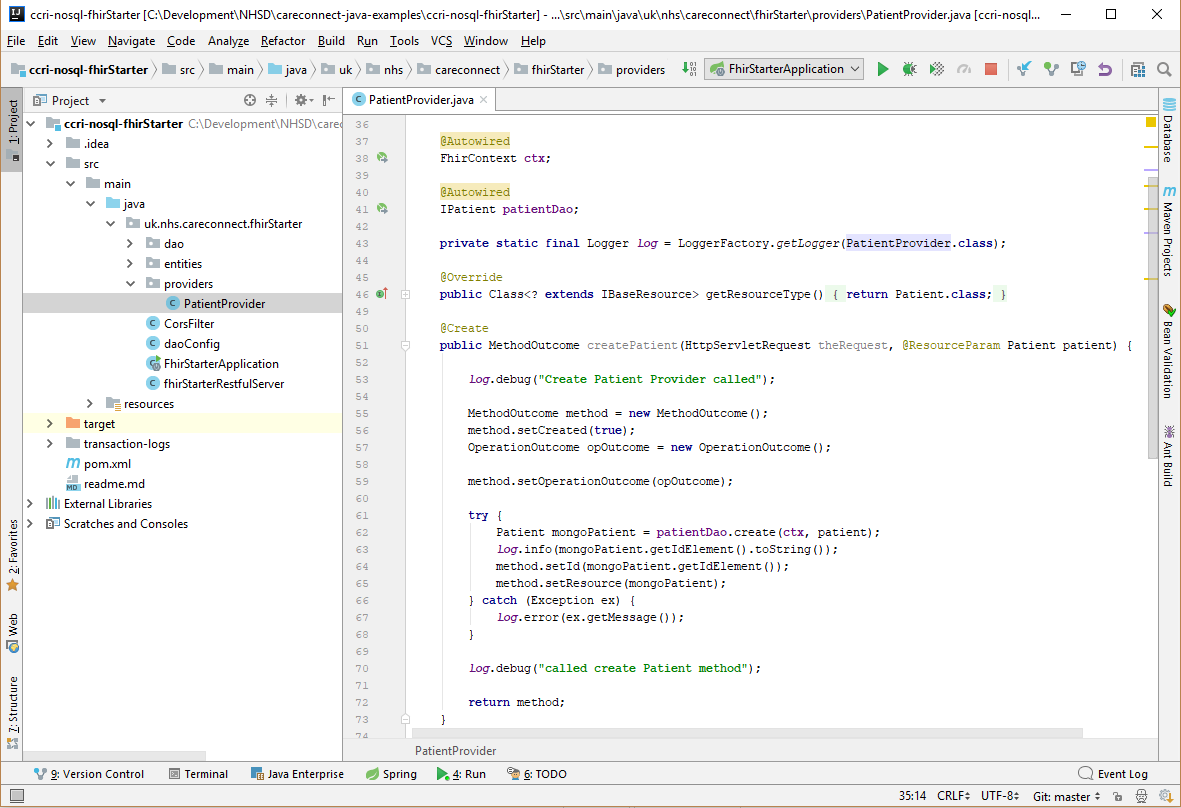
The HAPI RESTful Server is common to both projects. The configuration of this server can be found in the fhirStarterRestfulServer.java shown in the diagram below, configuration is described in more detail on the HAPI Server - REST Server website. The highlighted section shows the PatientProvider which is used to tell the HAPI Server that we support Patient and also where the implementation is. This is also where you can add in security, set default the server to use XML or JSON as default and many other options.
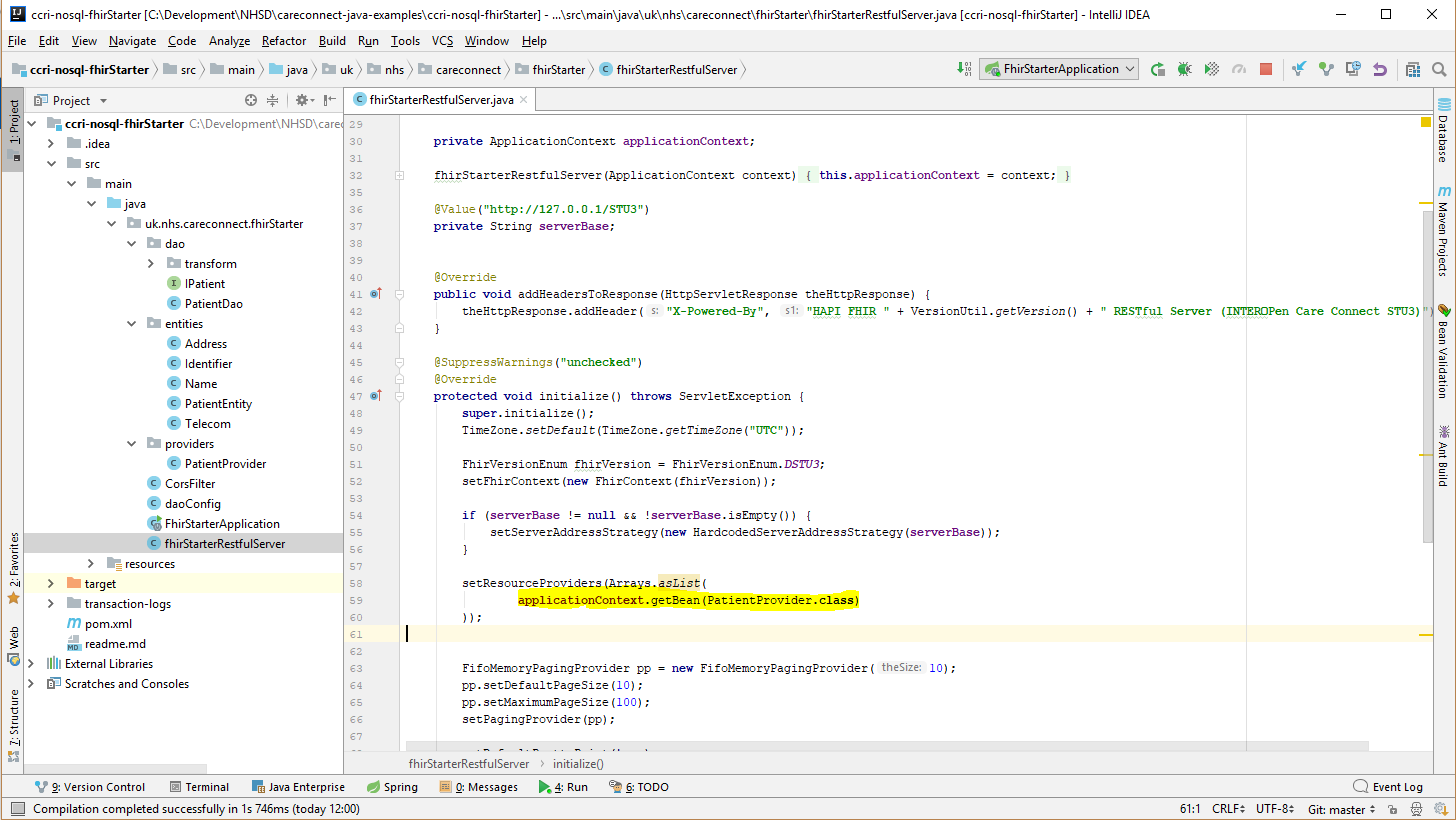
The Patient provider is where the FHIR Patient behaviour configured. HAPI uses annotations to indicate what service the procedures provide. The procedure createPatient in the diagram is annotated with @Create which indicates it handles POST/create. This procedure then uses a PatientDAO (DAO - data access object) class which uses Spring Data to persist the Patient resource in the MongoDB. For the sake of simplicity this guide does not cover the DAO class as this is specific to the implementation but an example is provided for you to explore.
Next we will add reading of the Patient resource. The DOA and code for @Read is provided, uncomment the @Read procedure and restart the server (mvn spring-boot:run), i.e.
/*
@Read
public Patient readPatient(HttpServletRequest request, @IdParam IdType internalId) {

    Patient patient = patientDao.read(ctx,internalId);

    return patient;
}
*/
Find and then remove the comments.
@Read
public Patient readPatient(HttpServletRequest request, @IdParam IdType internalId) {

    Patient patient = patientDao.read(ctx,internalId);

    return patient;
}
Once the server has restarted we can check the metadata to see the changes to the ConformanceStatement
Using POSTMAN we get:
      <resource>
           <type value="Patient"></type>
           <profile>
               <reference value="http://hl7.org/fhir/Profile/Patient"></reference>
           </profile>
           <interaction>
               <code value="read"></code>
           </interaction>
           <interaction>
               <code value="create"></code>
           </interaction>
       </resource>
To retrieve the Patient we first need to get the id of the Patient used in the MongoDB. In MongoDB this is the _id, which can be found either using MongoDb (see the earlier screenshot)
_id : ObjectId("5ac47fd723598f6af80ff1fe")
Or from the POST we did earlier in POSTMAN in the Location header from POST response.
This gives us the following request in POSTMAN
The response is in JSON format but if we wanted XML we can use the _format=xml parameter, e.g.
This is supported out of the box by the HAPI RESTful Server.
5. Search Patient
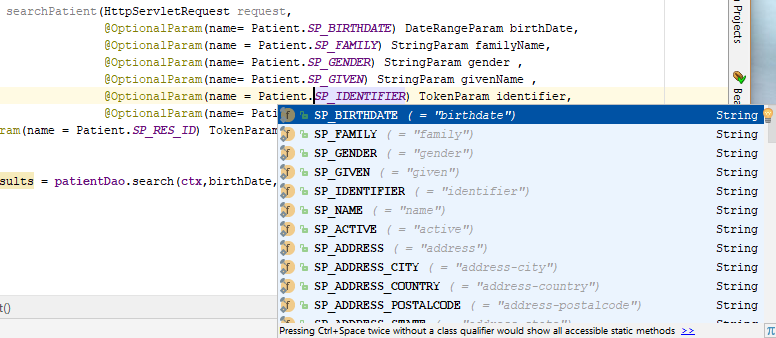
We have also provided a @Search method, locate plus uncomment this and restart the server.
@Search
public List<Resource> searchPatient(HttpServletRequest request,
                                    @OptionalParam(name= Patient.SP_BIRTHDATE) DateRangeParam birthDate,
                                    @OptionalParam(name = Patient.SP_FAMILY) StringParam familyName,
                                    @OptionalParam(name= Patient.SP_GENDER) StringParam gender ,
                                    @OptionalParam(name= Patient.SP_GIVEN) StringParam givenName ,
                                    @OptionalParam(name = Patient.SP_IDENTIFIER) TokenParam identifier,
                                    @OptionalParam(name= Patient.SP_NAME) StringParam name
        , @OptionalParam(name = Patient.SP_RES_ID) TokenParam resid

) {
    List<Resource> results = patientDao.search(ctx,birthDate,familyName,gender,givenName,identifier,name);

    return results;
}
Accessing the ConformanceStatement statement now gives:
<resource>
     <type value="Patient"></type>
     <profile>
         <reference value="http://hl7.org/fhir/Profile/Patient"></reference>
     </profile>
     <interaction>
         <code value="read"></code>
     </interaction>
     <interaction>
         <code value="create"></code>
     </interaction>
     <interaction>
         <code value="search-type"></code>
     </interaction>
     <searchParam>
         <name value="_id"></name>
         <type value="token"></type>
         <documentation value="The ID of the resource"></documentation>
     </searchParam>
     <searchParam>
         <name value="birthdate"></name>
         <type value="date"></type>
         <documentation value="The patient's date of birth"></documentation>
     </searchParam>
     <searchParam>
         <name value="family"></name>
         <type value="string"></type>
         <documentation value="A portion of the family name of the patient"></documentation>
     </searchParam>
     <searchParam>
         <name value="gender"></name>
         <type value="string"></type>
         <documentation value="Gender of the patient"></documentation>
     </searchParam>
     <searchParam>
         <name value="given"></name>
         <type value="string"></type>
         <documentation value="A portion of the given name of the patient"></documentation>
     </searchParam>
     <searchParam>
         <name value="identifier"></name>
         <type value="token"></type>
         <documentation value="A patient identifier"></documentation>
     </searchParam>
     <searchParam>
         <name value="name"></name>
         <type value="string"></type>
         <documentation value="A server defined search that may match any of the string fields in the HumanName, including family, give, prefix, suffix, suffix, and/or text"></documentation>
     </searchParam>
 </resource>
You will notice that all the @OptionalParam have become searchParam’s in the ConformanceStatement. We have only included the mandatory search parameters from the CareConnectAPI. HAPI has built in support for all standard parameters, see below:
Patient searches are now supported, for example to search for Patients on NHS Number we could do:
6. Next Steps
If you want to continue developing then there is a more detailed version of this project can be found in:
- careconnect-document: is a basic repository for storing FHIR Documents together with a simple Angular2 FHIR Client App.
This application adds a document index to the Patient index we have just built and provides storage for FHIR Documents.
Get involved in the building your own Care Connect FHIR server by following the full journey:
<?xml version=”1.0” encoding=”UTF-8”?>